The Big Picture of User Authentication

I always try to understand how things work before diving right into codes. Because it helps me work more efficiently as well as effectively. Having a big picture of your project is like holding a map in your hands on a journey. Because the map saves you a lot of time by guiding you where you are and where you should go, right?
It is not easy to develop user authentication with Node.js, Express, Passport, Mongoose, and Google OAuth API at first glance. If it is your first time to involve in user authentication, which is essential in a web service or product, you may scratch your head for a while. My job in this article is to uncover abstract concepts and flows of user authentication. I will use many diagrams which are my favorite tools to visualize something in questions.
User Authentication Flows
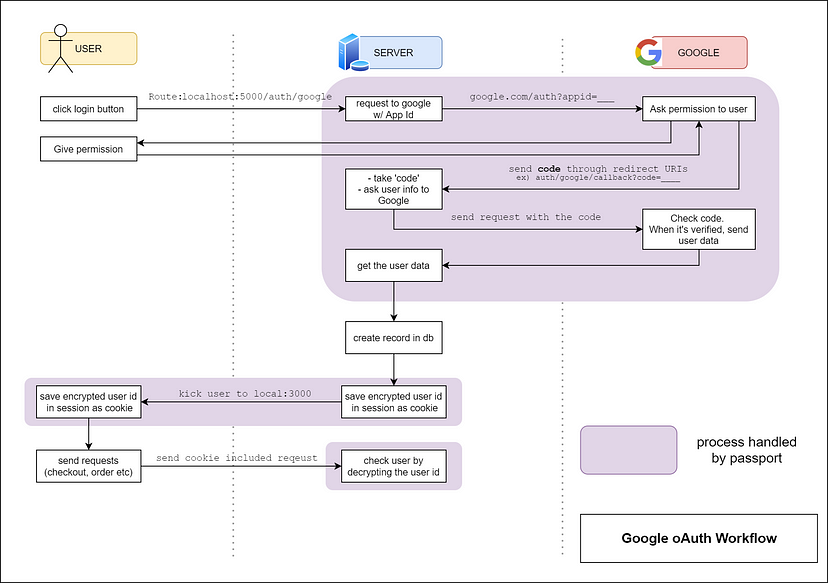
The diagram above describes the user authentication process flow. The original diagram is from Stephen Grinder's Github and I modified a little bit from his. Without further ado, let's begin.
The additional explanation on the top of the diagram
1. Handling the user’s sign-in request.
When a user clicks a Sign-in, login, or sign-up button, your server sends a request to Google and the request includes Client ID, Client Secret generated from Google Cloud Platform as well as a redirect URI. The redirect URIs are the endpoints to which the OAuth 2.0 server can send responses.
2. Google handles permission.
When Google receives the request, it checks your credential and then asks the user to give you permission. Once Google confirms that the user accepted to give you permission, Google sends a special code through the redirect URI. This special code is important. Because you can get the user data only in the case when this special code is verified by Google. Google is out from our scenario after passing over the user data to the server.
3. The server works with the data sent from Google.
Now the server has the user's data on its own hands. What should the server do with the data next? How does it ensure that the user has been authenticated and allowed to use our service? This is the step where MongoDB(database) and the cookie session comes into play. The server creates an instance of the user in the database if her/his information does not exist. The user data saved in MongoDB is going to be used to generate a cookie. In the scenario above, the cookie is an encrypted string of user data. This cookie stays in the session and it will be sent to the server when it sends a request to do other tasks such as checkout and making an order.
Passport makes the job easier
In the diagram above, the purple areas are the tasks handled by Passport. As you can see from the diagram, Passport will save your time and sweat concerning working with Google OAuth API and cookies. However, it is not easy to understand how Passport works at first glance. There are some confusing and abstract parts. I will briefly share my personal experience.
Passport uses what are called strategies to authenticate requests. Strategies range from verifying a username and password, delegated authentication using OAuth, or federated authentication using OpenID. Aside from Passport, therefore, you need to download passport-google-oauth20 package from npm to build authentification using Google. Of course, if you want to do it with other platforms such as Facebook, Twitter, or Github, you need other packages that are relevant to meet your needs. Also, you need the cookie-session or the expression-session packages which are relevant to setting up a cookie.
It was not crystal clear when it comes to callbacks in Strategy. Also, I struggled with understanding the done function and beneath the hood of the serialize and deserialize functions. You can check the articles below which gives you a picture regarding these questions.
The relationship between Google OAuth2 API, Node.js, Express, Passport, MongoDB, and other packages
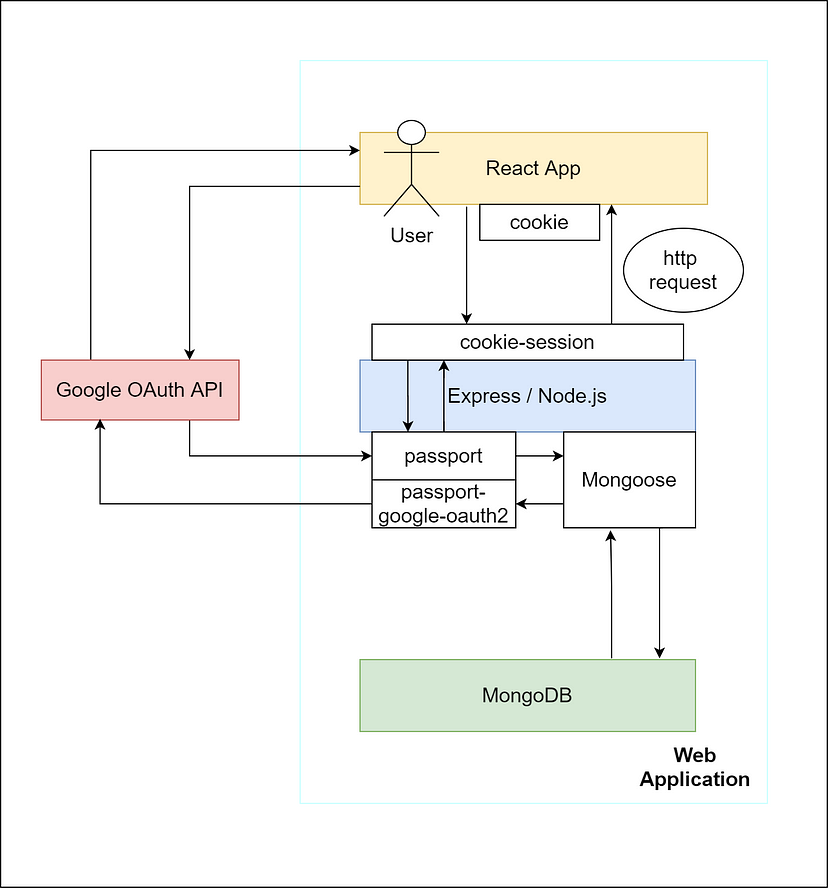
It is not enough to get the relationship between technologies and packages by only seeing the first diagram. I drew the second diagram in order to help you get a sense of how each technology interacts with another.
The file structure
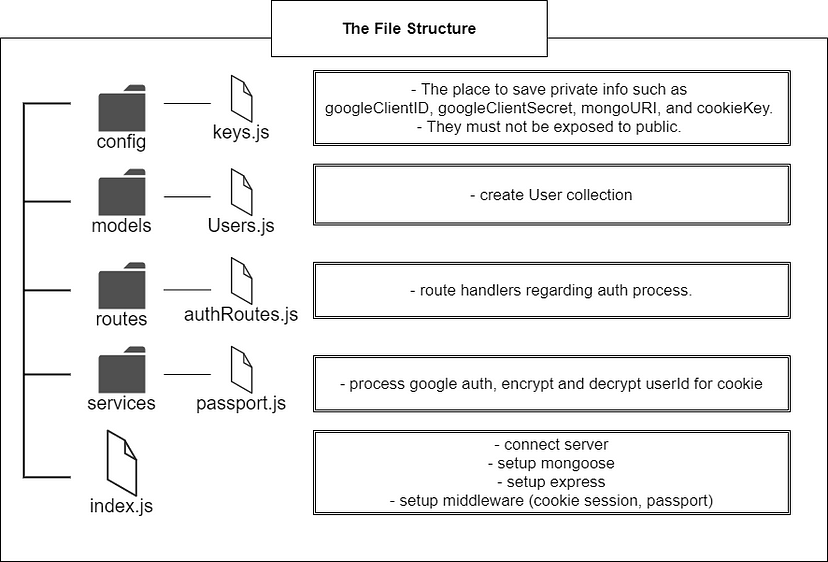
You can find codes for the user authentication in the Github. Instead of explaining every single line of codes, I will end up the article by introducing you to how I structured files.
Keys.js
The first directory, config, is the place where all private data reside in. Inside of keys.js I put Google Client ID, Google Client Secret, and mongo URI because they should not be exposed to the public and stay safe.
User.js
Users.js in the models directory has codes to work with a schema and a model for User collection in MongoDB. If you don't know about those concepts you can watch videos that I personally recommend through the links below. It is another topic that I can write another page of a post.
authRoutes.js
authRoutes.js handles requests sent from a user and this is the gateway to process the request.
passport.js
passport.js in the services directory has codes regarding passport. Inside of this file, there are codes regarding the purple areas of the first diagram.
index.js
index.js is like a center where express, passport, mongoose, and cookie session are interwoven together.
The file structure is just an example of mine. You can have totally different structure from mine depending on your style and at your convenience. So that's it for this article!
It was darn daunting when I first got around with Google OAuth2. Having no background in computer science, I needed to spend lots of hours to have a thorough understanding of how user authentication works.
Hope this article helps someone else who just feels lost in the middle of the project because of the user authentication. Happy coding!